
 How to add our Digital Timer to your Pinewood Derby Practice Track

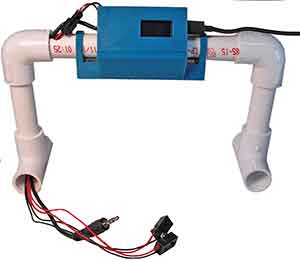
Pinewood Derby Track Timer
Use our track and this low cost timer to test your car or hold your own races.Features:
- Can be used on one and two lane tracks
- Built in 1" display shows times for both lanes
- Times and car speeds can be displayed on any android phone or tablet by using our free app.
- Can be used on tracks of up to 40 feet. An extension cable can be used for longer tracks.
You will need:
- Our track
- One of our track stands that support 16 foot or longer tracks.
- Our Track Starting Gate
- One 3/4" long (or longer) bolt and nut (two of each if you are building a two lane track).


The timer comes with the following components:
- Timer/display
- Magnet
- Support
- Cotton Ball
- Replacement Elbow
- Harness Assembly
- 40 foot Cable
- Magnetic Switch
- Finish Line Track
Assembly Instructions
The following instructions are for a two lane track. If you are building a one lane track, the steps are the same except where noted.
1. Slide the tube with the slot in the end through the two timer loops. The slot should be positioned so it is on the top or back.
2. Take one of the support columns apart then thread the harness assembly and connector that attaches to the cable through the column. If your AC Charger (or Battery Pack) will be used only for the timer then you can also thread it through the column. In the above picture, the Charger cable is the black cable that connects to the right of the timer.
3. Assemble the timer and support.
4. Connect the Harness Assembly cable connector to the connector on the timer.
5. Connect the charger connector to the right side of the timer but don't plug the charger into the wall yet.

6. Assemble the starting gate and the track stand except for the tall support column on the track stand.
7. Route the white Magnetic Switch end of the cable first through the Replacement Elbow (not shown) then through the pieces of the support column. When routing the cable, pull gently on the Magnetic Switch end and, at the same time, push on the other end.


10. Assemble the track and place it on the track stand.
11. Peel the backing paper off of the magnet and stick it on the right side of the right track directly under where the starting gate horizontal bar will be when resting on the track. The top of the magnet should be flush with the top of the track rail and the thin side of the magnet should be down. This magnet is what trips the magnet switch in the starting gate. For this to work, the magnet and switch must be close together when the starting gate is in the down position.

13. Place the assembled timer and finish line track at the end of the track (reserve one or two track sections for each lane to provide the cars room to slow down).

14. Attach the finish line track sections to the end of the track.
15. Insert the Harness Assembly lights in the track holes from the bottom in both sections. If using only one lane, tape the extra light away from the track so it doesn't interfere with the operation of the timer.
16.Place the timer directly over the hole in the track. If using only one lane, place that lane under the timer's left sensor. There are two small glass windows on the bottom of the timer. These windows are the sensors and must be directly over the lights in the track.
17. Run the black cable that you threaded into the track stand to the finish line and plug it into the black cable that you routed from the timer through the support column.

This and the next two steps can be skipped if you are building a one lane track.
18. For accurate timing, it is important that both cars start from the same position on the track. To do this, the horizontal tube on the start gate needs to be perpendicular with the tack. A carpenter's square or a new sheet of paper can be used. Place the long edge of the square or paper along the edge of the track and the short edge next to the horizontal tube. Adjust the connectors on the starting gate until the tube lines up with the paper edge.

19. The finish line lights also need to be perpendicular to the track. Use the carpenter's square or paper again to create a perpendicular reference. For small adjustments, move both lanes right or left. For larger adjustments, wrap a strip of paper or cloth around the bolt of one of the lanes at the starting line and secure with a rubber band

20. Place the timer over the lights so that the glass windows in the bottom of the timer are directly over the lights. Use the carpenter's square or paper again to create a perpendicular reference. Sight down the front of the timer and align the timer with the paper.
Operation
Large Display


If you don't have an android device, we have a limited number of Amazon Fire 7 tablets with a 7 inch display for only $54.95.
- Tap the Play Store (Appstore on some devices) icon on the home screen and search for pinewood derby. ABCPinewoodDerby Timer should show up in the results.
- Download and install ABCPinewoodDerby Timer but don't open it yet.
- Apply power to the timer.
- If needed, move so that you are within 30 feet of the timer.
- On the main screen, tap the Settings icon on your device (looks like a gear)
- Select "Connected Devices" or "Connections".
- Turn Bluetooth on
- Tap on the word "Bluetooth".
- ABCPinewoodAF should come up as an available bluetooth device. Click on the word "ABCPinewoodAF" to make it a pared device. If ABCPinewoodAF does not show up as an available device, move closer to the timer and make sure that the timer is on (the display should say "Ready to Race") then go back to step 5.
Operation
With the timer on, open the timer app when you are within 30 feet of the timer. Tap the Connect button then tap ABCPinewoodAF. The app is now ready to display the race results.
Troubleshooting
Timer does not come on when plugged into a power source
- Power plug may not be fully inserted into the timer. Remove the power plug from the right side of the timer then plug it in again making sure that it is all the way in.
- Power source may be faulty. Try using a different AC adapter (check that the DC Output is 5V - this will be printed on the adapter)
- If using the battery pack for power, recharge the battery pack.
"Check Sensor" is displayed and is flashing
The problem is at the starting gate. Either the connection between the timer and starting gate is bad or the magnetic switch at the starting gate isn't being triggered by the magnet. Check that the long black cable from the starting gate is plugged into the timer. Then move the track and/or the starting gate forward and back and left and right while watching the timer display until it says "Ready to Race".
"Check Sensor" is displayed and is not flashing
The problem is at the timer. Check that the two lights in the track at the finish line are directly below the windows in the bottom of the timer. Then pass your hand between one of the lights in the track and the timer. The display should blink once. If it does not blink then check that the light is connected correctly and that it is directly below the hole in the bottom of the timer. If "Check Sensor" does blink then do the same procedure for the other light.