 Drill axle holes in your pinewood derby car with the Body Tool
Standard Pinewood Derby car blocks have grooves in the bottom of the car for the axles guides. Grooved blocks have two problems. The first is that the groove is often not at a perfect right angle with the block and the second is that it is very difficult to insert the axle in the groove so that the axle is level with the track.
This tool:
- Allows you to drill accurate axle guide holes that are square and true into the existing axle slots with a hand drill! Your car will go faster if the axles are mounted correctly!
-
If your race allows axle holes, you can use this tool as a guide for drilling accurate holes. Again, improved axle mounting accuracy equals greater speed!
By correctly drilling the axle holes in the body, you will reduce friction and the car will run straight without bending the axles.
The required #44 drill bit needed for drilling the axle hole is included.

This tool easily places the axle holes perpendicular to the center line of the car and ensures that all the axles are parallel. The result is that your Pinewood Derby car will run straight down the track.
Test fit the Body Tool on the bottom of the block with the two 'ears' on the sides of the block. If the tool will not fit , use coarse grit sandpaper to reduce the width of the block until the tool fits. If the tool is loose, place a piece of paper - folded as needed - between one 'ear" of the tool and the block.

To create pilot holes in axle slots - Use a straight edge to draw a straight line on one side of the car starting at the middle of the axle slot to the top of the car. Repeat for the other axle slot.
To create new axle holes - Measure and mark the position of the new axle holes on one side of the block. Draw a straight line from the mark to the top of the block. Repeat for the other end of the block.

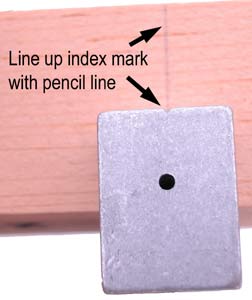
Position the tool on the bottom of the Pinewood Derby car with the two 'ears' on the sides of the block. Align the index mark with the line on the block. Clamp the tool in place.

Slowly drill through the guide hole in the tool and 3/4" into the block. Without releasing the clamp, turn the tool and block over and drill the second hole. Repeat for the other two holes.
Body Tool Video
Watch this video for more information on how to use the Pro Body Tool to drill axle holes for Pinewood Derby car.
Body Tool Transcript
The Pro Body Tool is designed for drilling and straightening axle holes for perfect alignment in Pinewood Derby cars. The tool has several features. One, each end is designed to drill new holes for long wheel bases or correct wheel slots in existing Pinewood Derby cars. The Pro Body Tool has a second hole for raising a front wheel for reduced friction.
Start by taking your body and drawing alignment marks on the body block with a square either marking where you would like your extended wheelbase or coming off of your existing slots for straightening.
Next place the Pro Body tool on the body, aligning the marks on the one side with the mark in the tool itself. If the body block fits loose, shim on the opposite until tight. Remember when drilling your holes move the tool from one end to the other without reversing it.
Next clamp the body block with the clamp and carefully drill each side with a hand drill. Once complete, move to the second position again noting not to rotate and repeat the process. Drill one side that you are going to use as your wheel that is going to contact the track. Next rotate the Pro Body Tool 90 degrees aligning the mark with your slot or transferred line across the bottom. Once the tool is aligned, clamp into position and drill.


