
 Basic
Pinewood Derby Car Building Instructions
Basic
Pinewood Derby Car Building Instructions
This page is for first time Pinewood Derby car builders with a few tips that experienced car builders might also find useful. These instructions were written to make building a Pinewood Derby car as easy as possible and, if you follow all of these steps, you will also end up with a fast car that just might win the trophy.
The right side of this page suggests tools and supplies that can be ordered from us to make your car building experience easier.
Please follow these safety guidelines:
Wear protective goggles, gloves and a dust mask to protect your eyes, hands and lungs
Lead is often used for weight. If you use lead, wear gloves and wash your hands after use. Do not melt lead. It is toxic.
Children should not use power tools without adult supervision
If this is your first time building a pinewood derby car, I suggest starting out with a simple design requiring only a few cuts of the block.
If you were given a pinewood derby kit then you can start with the first step on this page. If you do not have a kit or if you do not want to cut the block, we have several varieties of pre cut blocks, an assortment of prepared wheels and polished axles that are legal in all pinewood derby races and can save you time in the building process. You will need one block, four axles and four wheels as a minimum to build a car.
First Step - Check the Pinewood Derby Car Parts
The first step is to inspect the block, wheels and axles. If a part is defective, it is far better to replace it than to try to fix it.

The block
1. Inspect the pinewood derby block for cracks and chips. The block should be replaced if you find cracks near the axle slots or chips on the slots. You should also replace the block if there are any cracks that won't be removed when you shape your car.
 2.
Check for a warped block. Place the block on a flat surface
such as a kitchen counter. Push down on each corner of the block in turn
with your finger. The block should not rock. Turn the block on its
side and test the corners again.
2.
Check for a warped block. Place the block on a flat surface
such as a kitchen counter. Push down on each corner of the block in turn
with your finger. The block should not rock. Turn the block on its
side and test the corners again.
 3. Check that the axle grooves are perpendicular to the block side. Place
a credit card on the bottom of the block. Line the long edge of the credit
card with the side of the block then compare the short edge of the
credit card with the axle slot. The credit card edge should line up with the
axle slot. Check the other slot. If either slot isn't perpendicular with the edge of the block, your car won't roll straight. Either get another block or drill axle holes (if your rules allow).
3. Check that the axle grooves are perpendicular to the block side. Place
a credit card on the bottom of the block. Line the long edge of the credit
card with the side of the block then compare the short edge of the
credit card with the axle slot. The credit card edge should line up with the
axle slot. Check the other slot. If either slot isn't perpendicular with the edge of the block, your car won't roll straight. Either get another block or drill axle holes (if your rules allow).
The Axles
![]() 1. Inspect the axles for defects. Reject any that are bad.
1. Inspect the axles for defects. Reject any that are bad.
 2. Axles should be straight. Mount each axle in a drill and spin it. If
the head wobbles, the axle should be replaced or you can use our Pro
Axle Press to straighten the axle.
2. Axles should be straight. Mount each axle in a drill and spin it. If
the head wobbles, the axle should be replaced or you can use our Pro
Axle Press to straighten the axle.
 3. Pinewood derby axles
have burrs and crimp marks that should be removed then the axle should be polished to give your car more
speed.
3. Pinewood derby axles
have burrs and crimp marks that should be removed then the axle should be polished to give your car more
speed.

 4. Use a jeweler's file to remove the crimp marks and burrs. Do
this by mounting the axle in a drill then spin it while holding the file
on the axle. First, place the file on the crimp marks until they are
flush with the axle shaft. Then move the file to the inside of the axle
head and remove the two burrs. Next, tilt the file a few degrees and
press the file against the axle head to give the head a slight taper. This
will reduce the contact area between the axle head and wheel giving you
more speed.
4. Use a jeweler's file to remove the crimp marks and burrs. Do
this by mounting the axle in a drill then spin it while holding the file
on the axle. First, place the file on the crimp marks until they are
flush with the axle shaft. Then move the file to the inside of the axle
head and remove the two burrs. Next, tilt the file a few degrees and
press the file against the axle head to give the head a slight taper. This
will reduce the contact area between the axle head and wheel giving you
more speed.
5. Polish the axles. You will need 400 grit and 1200 grit sandpaper and a polishing paste. See our full instructions for polishing the axles.
The Wheels
 Mount each wheel on one of the axles that you prepared in the above step then spin the wheel.
Reject it if the wheel noticeably wobbles from side to side or if it only spins for a few seconds. Roll each wheel on a flat, dry, clean surface. The wheel should roll in a straight line and not wobble. Reject any that follow a curved path or that wobble.
Mount each wheel on one of the axles that you prepared in the above step then spin the wheel.
Reject it if the wheel noticeably wobbles from side to side or if it only spins for a few seconds. Roll each wheel on a flat, dry, clean surface. The wheel should roll in a straight line and not wobble. Reject any that follow a curved path or that wobble.
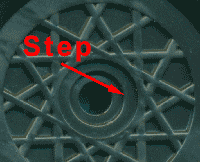 You can make the wheels faster by sanding the tread area to remove high marks and other imperfections and by removing the step from the outer hub (removing the hub step may be illegal in some pinewood derby races). We have wheels with these modifications already made to them. See our wheels or you can do it yourself with our tools. Remove the step from the outer hub with the Pro Hub Shaver. Sand the wheel tread with the Pro Wheel Mandrel. Polish the wheel hub bore with the Pro Bore Polisher and wax the hub bore with the Pro Bore Wax.
Design your Pinewood Derby Car
The first step is to have fun thinking up a car design. Don’t limit your imagination, but keep in mind that the more complicated the design, the harder it will be to shape your car. Very few races allow a car longer than the standard 7" block length so don't add anything to either end of the car. Your pinewood derby car should be under 4" high to clear the finish timers at the end of the track (some rules restrict the height to 3"). Check your race rules for other restrictions.
 An easy design is to cut your car in a wedge shape then add our plastic parts to create your car.
Before cutting your car, try different designs on paper until you have one that you like then trace the design on the block. First, make several outlines of the side of the block on a piece of paper and make marks where the axles will go. Now you can draw your car designs inside the tracing. You will notice that the axle slots have different spacings from the end of the block. The axle closest to the end of the block should be the rear axle.
A few general design guidelines:
If you plan on inserting weights in your car (most cars will need additional weight), design your car with enough wood in the back to accommodate the weights or design your car so that the weights can be attached to the outside of the block.
Leave at least 1/4" of wood on both sides of the axle slots to prevent cracking when inserting the axles.
The front of the car should not come to a sharp point. Leave at least a 1/2" flat area on the front for the starting pin to rest against.
Curves look nice but they are harder to cut. If you only have basic tools, it is better to use only straight lines.

Cut your Pinewood Derby Block
There are several ways to cut the block of wood. The easiest is to use a band saw. If you don't know anyone with a band saw, you might be able to bring your block into a hardware store and ask them if they will cut it for you on one of their demonstration saws.The following procedure is if you will be using a hand saw. I recommend securing the block of wood in a vise or to a bench with clamps. This is not only safer, but it will be faster and easier for the saw to go through the wood. For a single, basic cut, any handsaw will do. For more intricate cuts, use a coping saw which can cut curves. When cutting the block, hold the saw so that it cuts straight through the block and the cut follows the trace marks on both sides of the block. More information about using a coping saw.
Shaping your Block
After your block is cut, you can further shape it and round the corners by using a wood rasp. A rasp is a great tool for shaping your car. See How to use a rasp. Once again, be sure to wear protective gloves and a face mask so you do not inhale sawdust.To smooth your car, you can use a metal file and different grades of sandpaper. Start with a course grade of sandpaper - around 80 grit - and finish up with a fine grade of 160.
Adding weights to your Pinewood Derby Car
 The heaver your pinewood derby car is, the faster it will go so you want your car to weigh
right up to the 5 oz limit. You can use just about any metal object for
weights. We sell a variety of weights designed to be used for Pinewood
Derby cars.
You can glue the weights to the outside of the car or drill holes and insert
the weights inside the car. It is best to add the weights near the back
of the car for an extra speed boost. The height of the weight will not make a difference to your car's speed. If you drill holes in the car for
weights, you can use wood putty to seal the holes. Wood putty will require several hours to dry. If you are in a hurry, you can use a hot glue gun or super glue.
The heaver your pinewood derby car is, the faster it will go so you want your car to weigh
right up to the 5 oz limit. You can use just about any metal object for
weights. We sell a variety of weights designed to be used for Pinewood
Derby cars.
You can glue the weights to the outside of the car or drill holes and insert
the weights inside the car. It is best to add the weights near the back
of the car for an extra speed boost. The height of the weight will not make a difference to your car's speed. If you drill holes in the car for
weights, you can use wood putty to seal the holes. Wood putty will require several hours to dry. If you are in a hurry, you can use a hot glue gun or super glue.

Examples of weights for pinewood derby cars
If you don't have an accurate scale, you can take your car to the post office and use the scale there. If you plan on gluing parts to you car, be sure to weigh the parts with the car.
More details on adding weights to your pinewood derby car.
Painting your Pinewood Derby Car
 The first coat of paint will soak into
the wood. Try to not paint the area around the axle slot as shown to the left. This area will be coated with graphite later. After the first coat dries (about one hour), sand
it lightly with 200 or 400 grit sandpaper. Next
add one or two finishing coats to get a clean, polished look. Do
not sand between the finishing coats.
The first coat of paint will soak into
the wood. Try to not paint the area around the axle slot as shown to the left. This area will be coated with graphite later. After the first coat dries (about one hour), sand
it lightly with 200 or 400 grit sandpaper. Next
add one or two finishing coats to get a clean, polished look. Do
not sand between the finishing coats. Finishing Touches
After the last coat of paint dries, you can add decals, racing stripes or paint designs on the car. You can also glue on pieces of toys, like toy soldiers, car parts and so on. It's a good idea to use a final clear coat of paint if you are using racing stripes or decals. Paint the clear after the extra items have been added to the car.Adding Wheels and Axles
You are now ready to add wheels and axles to your pinewood derby car. First, you should
lubricate the car and wheels with graphite.

 Next are the wheels. Add more graphite to the sheet of paper if needed then rub the wheel hub into the graphite until you have a shiny ring of graphite around the wheel hub.
Rub the Q-tip in the graphite then rub on the wheel outer bore until the area around the bore is shiny.
Next you want to work as much graphite into the wheel bore as possible.
 1. Clean the wheel bore (hole). Run a clean pipe cleaner through the hole several times. Do this for each wheel. When done, Sprinkle some graphite on the pipe cleaner and run it through each wheel several times adding graphite often.
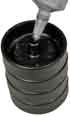 2. Stack the wheels on top of each other.
3. Plug the bottom wheel hole with your finger then pour a few puffs of graphite into the top hole.
 4. Plug the top wheel hole with your thumb then sake the wheels several
times.
4. Plug the top wheel hole with your thumb then sake the wheels several
times.5. Pour any loose graphite out of the wheel holes.


 6. Insert an axle part way into a wheel. Pour a few puffs of graphite into the other end of the wheel. Slowly push the axle up through the hole while shaking and turning the wheel to work as much graphite as possible between the wheel and axle.
  7. After the axle has been pushed all the way through the wheel, work more graphite between the wheel and axle by pouring
more graphite between the wheel and axle, moving the axle up and down and spinning and taping
the wheel.
7. After the axle has been pushed all the way through the wheel, work more graphite between the wheel and axle by pouring
more graphite between the wheel and axle, moving the axle up and down and spinning and taping
the wheel.  Mount the wheels on the car. The axles should be inserted as high in the slot as possible and should go straight in perpendicular to the block. Push the axle in until there is a credit card thickness gap between the wheel and block. Install the axles the right way with our Axle
Installer.
Mount the wheels on the car. The axles should be inserted as high in the slot as possible and should go straight in perpendicular to the block. Push the axle in until there is a credit card thickness gap between the wheel and block. Install the axles the right way with our Axle
Installer.When all four wheels are on the car, push the car forward on a flat surface. It should roll within two inches of straight for a three foot run. If the car doesn't roll straight, one of the wheels is pulling the car to the side. Remove one of the front wheels. Roll the car again. If it rolls straight then you know that the removed wheel is causing the problem.
by Dave Murry
Featured Product

LEGO Car Frame
Build a LEGO car that can race down a pinewood derby track. Great for parties and other events.
More on our LEGO frame This completes the basic cub scouts pinewood derby car building steps. You can find more detailed
car building instructions in the pinewood derby books that we offer.
This completes the basic cub scouts pinewood derby car building steps. You can find more detailed
car building instructions in the pinewood derby books that we offer.