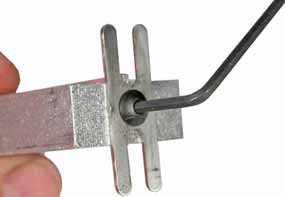
 How to use the Axle Guide on Your Pinewood Derby Car
Instructions


Pro Axle Guide Video
Watch this video on how to use the Pro Axle Guide to
properly insert your axles in a pinewood derby car.
Pro Axle Guide Video Transcript
The Pro Axle Guide is designed to straightly and correctly install axles into BSA Pinewood Derby cars where the slot is required. The Pro Axle Guide has two distinct features. Number one, a CNC machine ridge to line up in the slot of the block. And number two, a laser cut stainless steel tab designed for correctly spacing the wheels from the body.
First, rotate the tab to 90 degrees and lock with the provided Allen wrench. We recommend first test fitting the axle before preparing your car. Start by installing your Pro Axle Guide, inserting your axle, and an edge or table top can be used to firmly press in your test fit axle. Using an unprepared axle or one you might dispose of is recommended.
After completing all four axle insertion points, remove your test axle and your holes are complete. Finish you car in the manner you like, painting and waiting. Once the car is ready for final essembly, the tab is used as your wheel spacer to set the spacing between the wheel and the body. Insert the axle to the wheel and firmly insert the wheel until the axle is installed snugly and will no longer go in. Once the tool is removed, proper wheel spacing has been set. The opposite side of the Pro Axle Guide is flat and this is designed to be used when the builder has chosen to drill holes and does not have to use slots when building the car. The tab can be used for correct wheel to body spacing. Simply place the tool on the body, then install the axle firmly and remove for correct wheel to body spacing.


