
 How to use the Axle Bender Tool to improve Your Car's Performance

Pro Axle Bender
The Pro Axle Bender is a fully adjustable precision tool designed to bend all Pinewood Derby, Awana, Pine Car and other axles designed for Pinewood Derby type car races. Bending the axles allow adjustments for car alignment and tuning. Its unique bending cup design prevents distortion in grooved axles and eliminates any additional grooving at the bend point. Bend angles can be adjusted from 0.5° to 10°.
To use the Pro Axle Bender, you will need:
- 3/32" hex key
- Pointed Sharpie marker
- Ruler or other measuring tool
- Prepped axles (all burrs removed and polished)
- Light oil (optional)
Instructions

1. Place a mark on the axle head with the Sharpie. This mark will point to the direction of the bend and can be used as a reference when you install the axle in the car.
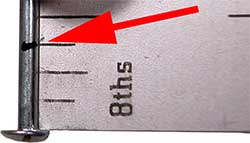
2. Mark a dot on the axle shaft 3/8"in from the axle head in line with the mark that you made on the head. This will be the location of the bend. The axle should be inserted into the car block up to this mark.


Axle Bender Video
Watch this video for more information on how to use
the Axle Bender tool to adjust for car alignment and tuning.
Axle Bender Transcript
The Derby Works Pro Axle Bender is the first multi-angled bender of it's kind. It features a unique blade and fork style pivot for accurate tracking when bending the axle. It features an adjustable collar stop with indent marks for repeatable angle bending as small as 1/2 of a degree to as high as 10 degrees locked with a simple 3/32 Allen wrench.
Our axle clamp features a knurled self centering knob and a floating hardened pin to keep everything straight and true as we clamp our axle to be bent. And our unique bending cup, first of it's kind, allows builders to protect multi-grooved axles and even bend stainless steel axles without adding a bend point groove mark or notch.
To correctly use your pro axle bender, you will need a machinist scale, or a machinist caliper, your axles, a 3/32 Allen wrench and a Sharpie.
First we are going to select the degree of bend we would like to start with. Derby Works will provide you with a bending chart and 4 common axles for each axle has it's own bend characteristic we will give you the amount of bend per mark.
For our first bend we will set it on number 1 and we will lock it, bending a BSA axle approximately 4 degrees. We are going to take a BSA axle with a 2 groove speed cut. First I will make a mark which will be my 12 o'clock mark, for straight up, bending and then adjusting once installed in the car. Next, using a ruler or a machinist scale, we will mark 3/8 of an inch on our axle. This is where we will insert it into the tool to create our bend.
At this point I loosen my cap, raise it, inserting my axle into the tool, bringing my mark to the cap from where my bend will be. With our unique bending cup, we're taking all the load off the front bearing surfaces and will prevent distorting this axle within the 2 bearing surfaces of the 2 groove axle.
At his point you can also elect if you would like to add a small amount of racing lubricant to it to aid or slide with the bend. Here I'll add a small drop of Krytox and then smoothly bend.
The bender can be used in a standard mode with a non grooved axle with great results. Again, mark your head, mark your bend, insert it in from the front side until your mark just protrudes, making sure your alignment mark is at 12 o'clock, clamp and bend.
Lastly the new Derby Works Pro stainless steel speed axles. Mark, bend, insert.
A perfect bend with an unaffected bearing area and no additional grooving or scrabbing required.